ComfyUI를 사용하려면 커스톰 노드가 필수적입니다. 커스톰 노드(Custom Node)란 ComfyUI에서 기본으로 제공하는 노드에서는 제공하지 않는 새로운 노드를 말합니다.
대부분의 경우, 커스톰 노드를 새로 만들 필요는 거의 없습니다. 어딘가 찾아보면 누군가가 이미 해당 기능을 하는 커스톰 노드를 만들어 두었을 가능성이 높기 때문입니다. 그래도 커스톰 노드가 어떻게 만들어지는지를 알아두면 혹시 원하는 기능을 제공하는 노드가 없을 때 새로운 노드를 만들거나, 마음에 안드는 노드를 수정할 수가 있을 것입니다.
다만, 여기에서 다루는 것은 매우 기초적인 내용이므로 참고만 하시기 바랍니다.
SDXL_prompt_styler 커스톰 노드의 구조
커스톰 노드에 대한 일반적인 설명에 앞서 간단한 커스톰 노드를 보여드립니다.
커스톰 노드는 기본적으로 여러개의 파이썬(python) 프로그램(필요시 폴더)이 들어있는 디렉토리입니다. ComfyUI\custom_nodes라는 폴더에 들어가보면 여러개의 폴더를 볼 수 있는데, 이것들이 각각 커스톰 노드입니다.
디렉토리 구조
커스톰 노드 폴더 속에는 여러개의 파이썬 프로그램들과 폴더들이 들어있을 수 있습니다. 아래는 제가 좋아하는 sdxl_prompt_styler 의 폴더 구조를 보인 것입니다.
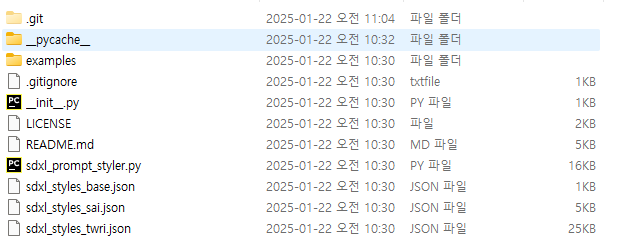
여기에서 꼭 필요한 것은 _init_.py 와 sdxl_prompt_styler.py 등 두 개의 파이썬 프로그램입니다. _init_.py는 ComfyUI가 실행되면서 커스톰 노드를 읽어들이면 처음에 실행되는 프로그램으로, 노드를 등록하는 역할을 합니다. 그리고 나머지 파이썬 프로그램(여기에서는 sdxl_prompt_styler.py)이 실질적으로 실행되는 내용을 담고있는 프로그램입니다.
_init_.py의 내용
먼저 _init_.py 를 살펴 보면 아래와 같습니다.
from .sdxl_prompt_styler import NODE_CLASS_MAPPINGS, NODE_DISPLAY_NAME_MAPPINGS

__all__ = ['NODE_CLASS_MAPPINGS', 'NODE_DISPLAY_NAME_MAPPINGS']
첫번째 줄은 현재 폴더에 있는 sdxl_prompt_styler.py 로부터 두 개의 클래스(노드에 해당합니다)를 불러 들여라(import)라는 뜻이고, 두번째 줄은 이 두 개의 노드를 실제로 등록하는 부분입니다.
참고로, 저는 이것보다 간단한 구조를 사용합니다. 다음 절을 참고하세요.
sdxl_prompt_styler.py의 내용
다음으로 sdxl_prompt_styler.py 프로그램을 살펴보겠습니다. 이 프로그램을 적당한 에디터에서 불러와서 살펴보면 맨 윗부분에 여러가지 함수들이 정의되어 있습니다. 이 함수들은 내부적으로 자료를 처리하는데만 사용되는 함수들이므로, 전체적인 구조와는 관련이 없습니다.
이 프로그램에서 class를 검색해보면, 아래와 같이 2개의 클래스가 정의되어 있음을 알 수 있습니다. 이 클래스의 구조에 대한 자세한 내용은 다음 절에서 설명합니다.
- class SDXLPromptStyler:
- class SDXLPromptStylerAdvanced:
그리고 맨 아래로 내려가면 아래와 같은 부분이 있습니다.
NODE_CLASS_MAPPINGS = {
    "SDXLPromptStyler": SDXLPromptStyler,
    "SDXLPromptStylerAdvanced": SDXLPromptStylerAdvanced,
}

NODE_DISPLAY_NAME_MAPPINGS = {
    "SDXLPromptStyler": "SDXL Prompt Styler",
    "SDXLPromptStylerAdvanced": "SDXL Prompt Styler Advanced",
}
앞쪽에 따옴표로 묶어둔 것은 그냥 스트링입니다. 즉, 그냥 "A" 나 "B"로 바꿔써도 아무 문제 없습니다. 그냥 내부에서 사용하는 이름일 뿐이죠. 예를 들어 아래와 같이 바꿔도 아무 이상없이 작동합니다.
NODE_CLASS_MAPPINGS = {
    "A": SDXLPromptStyler,
    "B": SDXLPromptStylerAdvanced,
}

NODE_DISPLAY_NAME_MAPPINGS = {
    "A": "SDXL Prompt Styler",
    "B": "SDXL Prompt Styler Advanced",
}
위쪽 NODE_CLASS_MAPPINGS 에서는 A는 SDXLPromptStyler 라는 클래스와 연결된다는 뜻입니다. 그리고 아래쪽 NODE_DISPLAY_NAME_MAPPINGS 에서는 A를 ComfyUI 화면에서 표시할 때 제목을 "SDXL Prompt Styler"라고 표시하라는 뜻입니다.
이 두 가지가 _init_.py에 들어있는 것입니다.
노드 클래스의 내용
노드를 정의하는 파이썬 프로그램(sdxl_prompt_styler.py)는 아래와 같은 형태로 구성되어 있습니다. 여기에서 윗쪽은 여러가지 함수가 정의되어 있는데, 이건 프로그램 짜는 사람이 편의상 만든 겁니다. 그 다음 class가 두개 정의되어 있고, NODE... 가 두개 있습니다.
def read_json_file(file_path):
def read_sdxl_styles(json_data):
....
def read_sdxl_templates_replace_and_combine_advanced(...):

class SDXLPromptStyler:
class SDXLPromptStylerAdvanced:

NODE_CLASS_MAPPINGS = {
NODE_DISPLAY_NAME_MAPPINGS = {
노드를 정의하는 파이썬 프로그램에서 가장 중요한 것은 클래스의 정의입니다. _init_.py에서 등록한 두 개의 클래스(SDXLPromptStyler 및 SDXLPromptStyperAdvanced)가 바로 그것입니다.
이 클래스는 크게 노드에 입력과 출력되는 내용을 정의하는 부분과 , 입력된 내용을 처리하는 부분으로 구성되어 있습니다. 차근차근 알아보겠습니다.
클래스 정의 바로 밑에는 아래와 같은 코드가 있는데, 이것은 그냥 이렇게 쓴다고만 생각하시면 됩니다.
    def __init__(self):
        pass
그 다음 @classmothod로 시작되는 부분은 입력되는 내용을 정의하는 부분입니다.
    @classmethod
    def INPUT_TYPES(self):
        return {
            "required": {
                "text_positive": ("STRING", {"default": "", "multiline": True}),
                "text_negative": ("STRING", {"default": "", "multiline": True}),
                "style": ((styles), ),
                "log_prompt": ("BOOLEAN", {"default": True, "label_on": "yes", "label_off": "no"}),
                "style_positive": ("BOOLEAN", {"default": True, "label_on": "yes", "label_off": "no"}),
                "style_negative": ("BOOLEAN", {"default": True, "label_on": "yes", "label_off": "no"}),
            },
        }
즉, 여기에는 "text_positive" 등 6개의 입력이 정의되어 있는데, 이것들은 각각 아래와 같이 [SDXL Prompt Styler]노드의 입력 위젯에 해당합니다.

그 바로 아래에는 출력 슬롯이 정의되어 있습니다. text_positive와 text_negative가 출력되고 그 타입은 STRING 임을 알 수 있습니다.
    RETURN_TYPES = ('STRING','STRING',)
    RETURN_NAMES = ('text_positive','text_negative',)
    FUNCTION = 'prompt_styler'
    CATEGORY = 'utils'
그리고 맨 아래에 있는 CATEGORY는 ComfyUI에서 우클릭 -> Add Node를 눌렀을 때 어떤 분류에 넣을지를 정의하는 것입니다. 보시는 것럼 utils 아래에 이 두개의 노드가 들어가게 됩니다.

FUNCTION에는 실제로 실행되는 프로그램을 지정하며 이는 바로 아래에 정의되어 있습니다. 그리고 이 프로그램은 자기자신(self)과 6개의 입력이 매개변수로 사용됨을 알 수 있습니다.
def prompt_styler(self, text_positive, text_negative, style, log_prompt, style_positive, style_negative):prompt_styler에 대한 상세한 내용은 생략합니다. 그냥 입력 받은 프롬프트에 지정한 스타일에 맞는 단어들을 추가해서 생성한 긍정적 프롬프트와 부정적 프롬프트를 반환하는 기능이라고만 알고 계시면 됩니다.
기타 필요한 내용
참고로, ComfyUI\custom_nodes에 들어가면 example_node.py.example이라는 파일이 있습니다. 이 파일을 들여다보면 노드 클래스를 정의할 때 추가로 필요한 내용이 어떤 게 있는지 알 수 있습니다. (저는 이해가 안되는 부분이 많네요.ㅠㅠ)
따라하기 1 - combine_text
여기에서는 아주 간단한 (실용적으로는 전혀 필요없는) 커스톰 노드를 생성해 보겠습니다.
1 단계: 커스톰 노드 설계
설계라고는 했지만, 머리 속에 있는 내용을 간단히 정리하는 것입니다. 여기에서는 아래와 같은 커스톰 노드를 생성할 계획입니다.
- 폴더 명 : combine_text
- 노드 프로그램 파일명 : combine_text.py
- 클래스 명: CombineText, 클래스 내부함수 combine_text
- 입력 : 두개의 텍스트를 입력받는다. 하나(text1)는 슬롯으로 입력을 받고, 다른 하나(text2)는 위젯으로 입력받는다. text2는 기본값(default)이 "Hello" 이다.
- 기능 : text1 에 text2를 이어 붙인 새로운 string을 만들어 반환한다.
- 출력: 하나의 출력슬롯(com_text)
2 단계: 커스톰 노드 폴더 추가
ComfyUI\custom_nodes 폴더 아래에 combine_text 라는 새로운 폴더를 추가합니다.
3 단계: _init_.py 파일 생성
적절한 텍스트 에디터에 아래와 같은 내용을 입력하여 _init_.py 파일로 저장합니다. 아래는 위에서 설명한 것보다 좀 더 간단하게 처리하였습니다. 보시는 것처럼 NODE_DISPLAY_NAME_MAPPINGS는 아얘 없습니다. 이 내용까지 NODE_CLASS_MAPPINGS에 포함되었기 때문입니다.
from .combine_text import *

NODE_CLASS_MAPPINGS = {
    "Combine Text Example": CombineText,
}
4 단계: 노드용 프로그램(combine-text.py) 생성
노드용 프로그램에서는 CombineText라는 클래스를 정의해야 합니다. 아래는 템플릿입니다. 이 커스톰 노드는 "Test Nodes"라는 별도의 카테고리에 나타나도록 하였습니다.
class CombineText:

    def __init__(self):
        pass

    @classmethod
    def INPUT_TYPES(self):

    RETURN_TYPES =
    RETURN_NAMES =
    FUNCTION = 'combine_text'
    CATEGORY = 'Test Nodes'

    def combine_text(self, text1, text2):

        return combined_text
이제 def INPUT_TYPES(self) 부터 정의합니다. 이 예제프로그램에서는 text1과 text2가 입력으로 사용됩니다.
    def INPUT_TYPES(self):
        return {
            "required": {
                "text1": ("STRING", {"default": "", "multiline": True}),
                "text2": ("STRING", {"default": "", "multiline": True}),
            },
        }
다음으로 반환 값을 설정합니다.
    RETURN_TYPES = ('STRING',)
    RETURN_NAMES = ('combined_text',)
    FUNCTION = 'combine_text'
    CATEGORY = 'Test Nodes'
마지막으로 실제 실행될 함수 combine_text를 정의합니다.
    def combine_text(self, text1, text2):
        text1 = text1 or ""  # Handle None values
        text2 = text2 or ""
        return (text1 + "\n" + text2, )
아래는 이제까지의 내용을 모두 합친 것입니다. 보시는 것처럼 SDXL_prompt_styler.py 와는 달리, 맨 아래쪽에 NODE... 가 없습니다.
class CombineText:

    def __init__(self):
        pass

    @classmethod
    def INPUT_TYPES(self):
        return {
            "required": {
                            # "text1": ("STRING", {"default": "", "multiline": True, "forceInput": True}),
                            "text1": ("STRING", {"default": "", "multiline": True}),
                            "text2": ("STRING", {"default": "Hello World!", "multiline": True}),
                        }
                }

    RETURN_TYPES = ('STRING',)
    RETURN_NAMES = ('combined_text',)
    FUNCTION = 'combine_text'
    CATEGORY = 'Test Nodes'

    def combine_text(self, text1, text2):
        text1 = text1 or ""  # Handle None values
        text2 = text2 or ""
        return (text1 + "\n" + text2, )
5 단계: 실행
이제 ComfyUI를 처음부터 실행시킵니다. 실행화면에 아래와 같이 이번에 만든 커스톰 노드가 나타나면 정상적으로 실행된 것입니다.

다음으로 ComfyUI화면에서 우클릭을 하고 Combine Text Example을 찾아 노드를 추가하면 아래와 같습니다.
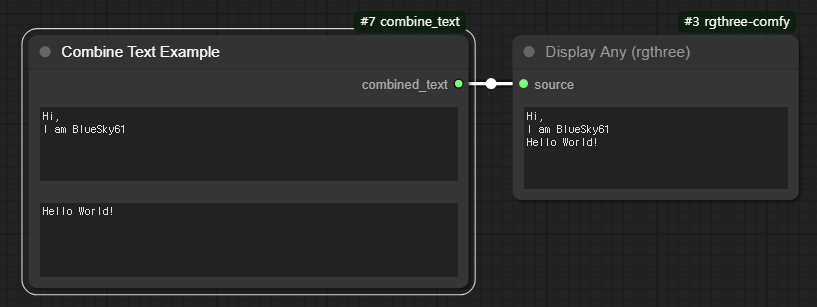
생각한 대로 실행되네요. 다행입니다!!
따라하기 2 : image_out
이번엔 텍스트를 입력받아, 이미지로 출력하는 노드를 생성해 보겠습니다. 이 노드는 별도의 커스톰 노드를 생성하지 않고, 위에서 만들어둔 combine_text 커스톰 노드에 추가합니다.
1 단계: 노드 설계
- 클래스 명: ImageOut, 클래스 내부함수 image_out
- 입력 : 이미지 크기(img_width, img_height), 텍스트(text), 폰트(font_size, found_color), 배경색(background_color)
- 기능 : 정해진 크기의 이미지에 입력받은 텍스트를 그린다.
- 출력: 하나의 출력슬롯(out_image)
2 단계: 클래스 작성
아래는 클래스의 템플릿입니다.
class ImageOut:

    def __init__(self):
        pass

    @classmethod
    def INPUT_TYPES(cls):

    RETURN_TYPES = ("IMAGE",)
    RETURN_NAMES = ("IMAGE",)
    FUNCTION = "image_out"
    CATEGORY = "Test Nodes"

    def image_out(self, image_width, image_height, text,
                   font_size, font_color, background_color):

        return (output_image)
다음은 입력 유형을 정의합니다.
이미지의 폭과 높이는 최소 64 최대 2048, 기본값은 512로 두었습니다.
       return {"required": {
                    "image_width": ("INT", {"default": 512, "min": 64, "max": 2048}),
                    "image_height": ("INT", {"default": 512, "min": 64, "max": 2048}),
                    "text": ("STRING", {"multiline": True, "default": "Hello World"}),
                    "font_size": ("INT", {"default": 50, "min": 1, "max": 1024}),
                    "font_color": (["white", "black", "red", "green", "blue", "yellow"],),
                    "background_color": (["white", "black", "red", "green", "blue", "yellow"],),
                    }
                }
실제 프로그램은 ChatGPT의 도움을 받아서 작성합니다. "image_width, image_height, text, font_size, font_color, background_color를 입력받아서 텍스트가 가운데 들어가도록 이미지를 출력하는 파이썬 프로그램을 짜줘"라고 한뒤, 적당히 편집해서 사용합니다.
    def image_out(self, image_width, image_height, text,
                   font_size, font_color, background_color):

        # Create a new PIL image
        new_img = Image.new("RGBA", (image_width, image_height), background_color)
        draw = ImageDraw.Draw(new_img)

        # Define font
        font = ImageFont.truetype("arial.ttf", size=font_size)

        # Get the image center
        image_center_x = image_width/2
        image_center_y = image_height/2

        # Draw the text, mm = text center
        draw.text((image_center_x, image_center_y), text, fill=font_color, font=font, anchor="mm")

        # Convert the PIL image to a torch tensor
        image_out = pil2tensor(new_img)

        return (image_out,)
여기에서 pli2tensor는 PIL 이미지를 텐서 이미지로 변환하는 함수입니다. 이 함수는 해당 클래스 내에 정의해도 되지만, 다른 프로그램에서도 사용할 수 있기 때문에 맨 위쪽에 정의합니다.
def pil2tensor(image):
    return torch.from_numpy(np.array(image).astype(np.float32) / 255.0).unsqueeze(0)
이제 프로그램은 끝났고, 이 프로그램이 작동하기 위해 아래와 같은 import 문을 맨 위에 추가합니다.
import numpy as np
import torch
from PIL import Image, ImageDraw, ImageFont
아래는 이렇게 정의된 combine_text.py 입니다. 너무 길어서 닫아 뒀습니다. "더보기"를 누르면 확인하실 수 있습니다.
import numpy as np
import torch
from PIL import Image, ImageDraw, ImageFont

def pil2tensor(image):
    return torch.from_numpy(np.array(image).astype(np.float32) / 255.0).unsqueeze(0)

class CombineText:

    def __init__(self):
        pass

    @classmethod
    def INPUT_TYPES(self):
        return {
            "required": {
                            "text1": ("STRING", {"default": "", "multiline": True}),
                            "text2": ("STRING", {"default": "Hello World!", "multiline": True}),
                        }
                }

    RETURN_TYPES = ('STRING',)
    RETURN_NAMES = ('combined_text',)
    FUNCTION = 'combine_text'
    CATEGORY = 'Test Nodes'

    def combine_text(self, text1, text2):
        text1 = text1 or ""  # Handle None values
        text2 = text2 or ""
        return (text1 + "\n" + text2, )


class ImageOut:

    def __init__(self):
        pass

    @classmethod
    def INPUT_TYPES(cls):
        return {"required": {
                    "image_width": ("INT", {"default": 512, "min": 64, "max": 2048}),
                    "image_height": ("INT", {"default": 512, "min": 64, "max": 2048}),
                    "text": ("STRING", {"multiline": True, "default": "Hello World"}),
                    "font_size": ("INT", {"default": 50, "min": 1, "max": 1024}),
                    "font_color": (["white", "black", "red", "green", "blue", "yellow"],),
                    "background_color": (["white", "black", "red", "green", "blue", "yellow"],),
                    }
                }
    RETURN_TYPES = ("IMAGE",)
    RETURN_NAMES = ("IMAGE",)
    FUNCTION = "image_out"
    CATEGORY = "Test Nodes"

    def image_out(self, image_width, image_height, text,
                  font_size, font_color, background_color):
        # Create a new PIL image
        new_img = Image.new("RGBA", (image_width, image_height), background_color)
        draw = ImageDraw.Draw(new_img)

        # Define font
        font = ImageFont.truetype("arial.ttf", size=font_size)

        # Get the image center
        image_center_x = image_width / 2
        image_center_y = image_height / 2

        # Draw the text, mm = text center
        draw.text((image_center_x, image_center_y), text, fill=font_color, font=font, anchor="mm")

        # Convert the PIL image to a torch tensor
        image_out = pil2tensor(new_img)

        return (image_out,)
3 단계: __init__.py 프로그램
마지막으로 __init__.py 프로그램에서 이 노드를 추가해줍니다.
from .combine_text import *

NODE_CLASS_MAPPINGS = {
    "Combine Text Example": CombineText,
    "Image Output Example": ImageOut,
}
4 단계: 실행
이 커스톰노드를 실행하면 아래와 같이 [Example Output Example]노드를 추가해서 이미지를 생성할 수 있습니다.

위에서 정의한 combine_text와 결합하여 사용할 수도 있습니다.

가끔 이상한 커스톰 노드를 만나면 좀 수정하고 싶을 때가 있었는데, 저도 이 글을 쓰면서 많이 배웠네요.
이상입니다.
이 글은 이 글을 일부 참고하여 작성하였습니다.